
Once part of the structure of a room, decorative ceiling beams can now be part of any home. From real to faux wood, the beams can add interest in an often neglected area. The powerful design element of a decorative ceiling can transform the entire room, adding warmth and depth.
Ceiling Beams As a Decorating Tool
Traditional ceiling beams are actually wooden joists left exposed across the ceiling rather than boxed in or hidden above a ceiling. You can add decorative non-structural ceiling beams that can be made of wood, plastic, foam, and resin. They are lightweight and available in many textures, some that mimic wood beams. Some faux beams also offer the option to add recessed lighting. Textured beams break up a flat ceiling and add interest to the décor.
Why Homeowners Use Decorative Beams
Decorative beams can be a great way to add some interest to your home. Use them in any of the following scenarios:
- Extremely high ceilings: Decorative beams bring the scope of the room down a bit while providing interest.
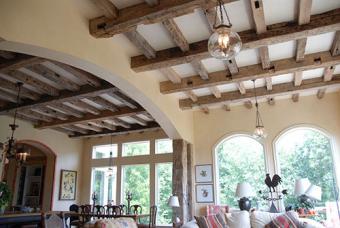
- Rustic home designs: From farmhouse to Tuscan, a number of home designs can be subtly enhanced by decorative beams added to the ceiling. Choose a textured beam that works with the style of the room to complete the design.
- Balance: Homes with dark wood trim or dark wood floors benefit by adding a same-colored wood beam or faux wood species. The repetition of the wood finish will help to create a cohesive design.
Four Types of Decorative Beams
From real, solid wood to faux wood designs, there are numerous choices available on the market today. All are available in straight, curved, and lofted appearances, so you can get the design you're after.
Basics of the Beams
No matter which type you select, there are going to be some items that hold true for them all. This includes:
- Measuring: Take width and length measurements of the ceiling space where you wish to install the beams. Transfer measurements to the beams. Be sure to double check measurements before cutting beams.
- Scaling the layout: Use graph paper to draw out the ceiling scaled to your measurements.
- Size and length options: Use the manufacturer's sizes and lengths to calculate what you need for your design.
Hiring a Professional Versus DIY
Before you purchase and install any of the beam types, you'll want to have your home inspected so you know the ceiling can support the additional weight of the type you buy. If you're a skilled carpenter with ceiling experience, you may be able to install a few types (see skill levels for each individual project).
However, solid wood beams and any ceiling project for a beginner or those lacking the proper skills should be done by a trained professional.
Solid Wood
Solid wood beams are the most expensive, as well as the heaviest, but can give the most authentic look. If you have a true farmhouse or other older, rustic style home, real wood beams care a must. You can create a loft effect by install the beams a few feet below the ceiling, depending on ceiling height.
-
Board & Beams Wood Products sell solid wood beams in knotty western red cedar, oak rough sawn, hem fir/spruce rough sawn, cherry, cypress, and greenheart.
-
Elmwood Reclaimed Timber features reclaimed hand hewn and rough sawn solid wood beams.
How to Create This Look
This look is created with hand hewn beams made from reclaimed timber. You can use any type of wood beams to mimic this design. These beams are not certified to use as support beams and are purely decorative. Solid wood beams will add weight and stress to your existing ceiling. You will need to attach the wood beams directly to the ceiling joists. This means you must first:
- Know where the ceiling joists are located.
- Know the sizes and dimensions of the ceiling joists.
- Use this information to determine how much weight load your ceiling can hold.
Other things to consider include:
- Skill level: You'll need a high level of carpentry skills and knowledge to tackle this as a DIY project. The beams will be attached directly to the ceiling joists using lag bolts or threaded screws. Unless you've done this type of work in the past, hire a professional.
- Acclimate beams: Supplier Elmwood Reclaimed Timber suggests that prior to installing the beams you allow one to two weeks for them to acclimate to your home environment.
- Dimensions: Elmwood beams are available in dimensions 12" x 12"+ with 4' to 30' lengths. Other suppliers may offer different sizes. Be sure you understand what's available.
- Stain: Depending on the options your supplier offers, you may be able to select a pre-finished stain. If you're doing it yourself, you can select a stain from your local hardware store.
- Where to Use: You'll need high ceilings to justify using such a bold beam design created by large beams. A rustic, Mediterranean, Spanish or lodge style home design will be highlighted by this type of ceiling beam choice.
Box Wood

Box wood beams create a stunning look for a room and appear to be solid wood beams. This type of beam is a great alternative if you are concerned about the weight load wood beams would put on your ceiling joists. In addition, this type of decorative beam is less expensive than solid wood beams. One of the best advantages of this type of decorative beam is the ability to hide plumbing, wiring and even speakers in these hollow three-sided lengths. Another way to use box wood beams is in a coffered ceiling design.
- FauxWoodBeams.com showcases four styles of real wood box beams: heavy and light hand hewn, barn board, and wire brushed.
- Southern Woodcraft & Design timber products include box beams that look like solid timbers beams.
How to Create This Look
A box wood beam design can enhance any ceiling and can be configured to create various designs. You can opt for rough hewn or smooth finish, depending on your decor style. The best look is to run beams to wall and not leave gaps between beam and wall.
- Skill level: This project requires carpentry skills and knowledge to tackle this as a DIY project; if not, you'll want to check with local professionals. If you're a skilled DIYer, you can make simple box beams by using thin pieces of textured wood. Just piece them together to form a hollow box. You may choose to purchase box beams and install according to manufacturer's guidelines.
- Size and lengths: Southern Woodcraft offers wood box beams in sizes, 4x6, 4x8, 6x8, 6x10, 8x8, 8x10, 10 x 10. The height of the beams increases with the widths, so the 4x6 beam won't be as high as 6x8 beam.
- Dimensions: The dimensions increase with the beam lengths, for example a 4x6 beam dimensions are 3.5"H x 5.5"W (4x6) whereas a 6x8 beam is 5.5"H x 7.5"W.
- Installation: You'll want to pull a chalk line for each beam placement on your ceiling for setting each support. Bevel cut blocks will be placed every 3 feet and attached to ceiling joists with toggle bolts. If ceiling joists aren't where your beam pattern requires, you can use mollies or anchors for attaching the blocks to the ceiling. In addition to screws, you can also use construction adhesive to further secure beams to the ceiling and blocks. The box beam will fit over and secured to the blocks with deck screws.
- Stain: Depending on the options your supplier offers, you may be able to select a pre-finished stain. If you're doing it yourself, try several samples from your local hardware store. You can also paint the beams to contrast or match your ceiling paint color.
- Where to Use: You can use box wood beams in homes with 8' or higher ceilings. The higher the ceiling, the bigger the beams you can use. A coffered beam design can be stained or you may decide to paint for a more formal decor.
Faux Wood
Faux woods come in a variety of materials from vinyl to lightweight foam to fiberboard. They are inexpensive and lightweight, coming in all the colors and textures of real wood. Choose these only if they'll be mounted up close to a high ceiling to avoid scrutiny, particularly if there is real wood near the beams. However, many faux wood beams are so well-made they are almost impossible to detect they aren't authentic.
- FauxWoodBeams.com also offers several high density polyurethane foam beams.
- Foam Factory presents simulated wood beams that are computer precision cut.
How to Create this Look
Most faux wood beams are comparable to other types of beams in their dimensions. Otherwise, you'll need the following to recreate the look:
- Skill level: This project requires very basic carpentry skills, such as measuring, using a saw, hammer and screw driver. However, if you read the instructions and do not have the necessary experience, hire a professional.
- Installation: The same block installation method used for box wood beams can be used for the faux beam installation. For other types of installation systems be sure to follow the manufacturer's guidelines.
- Stain: Some faux beams are available pre-stained. You can use regular stain for most rigid polyurethane foam beams. It's always best to check the manufacturer's recommendations for stain or paint finishes.
- Where to Use: Faux beams are typically much lighter weight than wood or box wood beams. This means you can use this type of beam on ceiling that might not support the weight of real beams.
Painted Beams

This technique is specialized and requires a very skilled artist or illustrator who can paint realistic 3D beams on the ceiling. The technique trompe l'oeil (fool the eye) can be used, especially on high ceilings and might be cheaper than using wood, depending on artist fee.
- Skill level: This type of wood beam effect requires a 3D artistic skill set. If you are an accomplished artist, but have never attempted 3D painting, you may wish to view video tutorials to test your ability.
- Dimensions: The beam dimensions will be part of the illusion you create with the 3D technique.
- Installation: The installation will be the actual painting of the beams and ceiling treatment you decide best suits the room.
- Stain: You can customize the look of stain by using paint combinations.
- Paints: You'll get the best results for a ceiling mural with interior latex paints. Art Is Fun advises people to use an eggshell sheen instead of satin or semi-gloss paints. When it comes to the details of your faux beams, you can switch to your artist acrylic paints.
- Where to Use: The big advantage of 3D painted ceiling beams is you can create this illusion on any ceiling without concerns for weight load and carpentry skill levels. You still want to keep size in keeping with the overall size and height of the ceiling. For example, you don't want to overpower an average height ceiling with huge overbearing beams.
Four Room Transformations Using Beams
You can transform any room with the right choice of ceiling beam treatment. Refer to the section on types of beams when making a decision which beam to use for your project.
Wood Options
Some of the woods often used for interior decorative beams include:
- Knotty western red cedar: This wood reveals the knots in the grain and comes in all grades. It's an excellent choice for a rustic look or a clear smooth unstained look with a clear sealant.
- Rough sawn oak: Another good choice for a rustic look. Oak is a strong and can be used both for support and decorative uses. Stain or paint for the desired look.
- Hemlock Spruce: This wood is often used for timber framing and can also be used for decorative wood beams. Stain or paint for the desired look.
- Pine: There are many grades of pine beams, including knotty pine that reveals the beautiful characteristics of this species. You can clear finish or stain and even paint should you desire.
- Douglas Fir: This strong wood can be finished as a rough hewn to smooth. Either stain or paint for the look you desire.
Ceiling Projects Require Professional Carpentry Skills
Before you start working with the ceiling beams, you should have your home inspected by a professional to ensure the ceiling can bear the additional weight of the decorative beams. The projects should only be attempted by a highly skilled, well-trained carpenter with building experience.
Hiring a skilled professional is always the best option when working with the ceiling. If you are a beginner or don't have experience working with ceilings, look for a local contractor or skilled construction crew who can complete the project for you.
Modern Home Office

Expand your modern home office design with an unexpected exposed ceiling. This design creates a visual artistic addition to this home office. It can be used in any home, but is best served when it becomes part of a modern visual statement.
- Make this look like a work of modern art by cutting through your existing ceiling in a zigzag pattern. Be sure to allow enough ceiling intact for adequate support.
- Measure the ceiling and transfer to scale on graph paper.
- Draw the zigzag pattern onto the layout.
- Transfer these measurements to your ceiling to ensure accurate cuts for the zigzag effect. Mark using a chalk line to guide each cut.
- Cut away the remaining upper ceiling.
- Refer to the different types of beams and follow instructions for installation.
- Be sure that you cut the beams long enough so they appear as though they continue through the wall.
- Add a few ceiling lights and you're done.
Lowered Living Room Ceiling

Many modern homes have two-storied ceiling heights and can present design challenges. This design uses a visual solution for anyone wishing to remove the emphasis of a tall ceiling. By installing wood beams just underneath the upstairs landing the visual effect is a lower ceiling that gives the room a cozy appeal.
The beams are notched so they extend above the bottom of the landing to give the visual effect of support. The light pouring in through the wall of windows is filtered and creates a patterned effect throughout the room; a nice design benefit of light and shadows.
- Measure the distance between the outer wall and the wall beneath the landing.
- Measure the distance of the landing overhang.
- Cut beams using the measurement taken between the walls.
- Use the second measurement over the landing overhang. Transfer this measurement starting at one end of the beam and mark with a pencil. This is where you will cut the notch so it fits snuggle underneath the landing.
- Secure each beam to the wall using the proper installation for the type of beam you selected, such as using a rim joists and lag bolts.
- It's easier to stain or paint the beams prior to installation and then simply touch up once installed.
Fishbone Beam Design

A vaulted ceiling is ideal for a fishbone beam design. This consists of the main beam that runs through the center length of the ceiling where the two sloping ones from the walls meet the roofline. This resembles the spine of the fish with the bones, a.k.a. beams, radiating from the spine along the ceiling slope. The bones end where the ceiling and wall join.
- Measure the ceiling and transfer to scale on graph paper.
- Use a chalk line to guide installation of each beam.
- The main beam can be comprised of several lengths for easier installation and better distribution of weight. Be sure your ceiling joists can support additional weight before attempting this. You may decide faux beams are the best choice for your project.
- Measure and cut the main beam and install so it appears as a solid one piece beam from one wall to the next
- Cut bone beams and install using the chalk line to ensure accurate placement.
- Use the appropriate system for installing the beams per the manufacturer's guidelines.
Enhance a Normal Height Ceiling

You can enhance a ceiling that has a normal height by adding thin narrow beams. This can bring a nice look to your room.
- The beams should be in scale to the height and size of the room so the finished look is pleasing and looks as though it was part of the original design plan for the room.
- Avoid oversized or large beams. These will detract from the space between floor and ceiling and end up creating a claustrophobic feeling that the ceiling is falling in on the room.
- Dark beams stand out against a light ceiling color and match the darker color of the lighting fixture. Another look might be to paint the beams white and the ceiling a light to medium color. This will draw attention to the beams while adding color to your room.
Coordinating Looks and Colors
Decorative ceiling beams aren't for every home. Consider the size of your room and ceiling height before committing to a design. Whenever possible, match the existing color or species of wood trim and floors in the home to create an authentic look. Decorative ceiling beams can be stained, left natural, or painted, depending on the look you desire for your home.


